Git 설치
Git 저장소 만들기
콘솔 창에서 아래 명령을 실행한다.
$ git initInitialized empty Git repository in ~/djangogirls/.git/$ git config --global user.name "Your Name"$ git config --global user.email you@example.com
위와 같은 저장소 초기화는 프로젝트를 시작할 때 한번만 하면 된다.
git은 디렉토리에 모든 파일과 폴더들의 변경점을 추적하는데, 특정 파일들을 무시(ignore)하기 위해서 .gitignore이라는 파일을 만들고 아래와 같이 작성한다.
xxxxxxxxxx*.pyc*~__pycache__myvenvdb.sqlite3/static.DS_Store
git add 하기 전이나 변경된 점을 확인할 때마다 git status 명령어를 사용한다. git status 명령은 미추적, 수정된, 스테이징된 파일, 브랜치 상태와 그 외 많은 정보를 보여준다.
x$ git statusOn branch masterInitial commitUntracked files:(use "git add <file>..." to include in what will be committed).gitignoreblog/manage.pymysite/nothing added to commit but untracked files present (use "git add" to track)
이제 아래 명령을 실행해서 만든 코드들을 저장소에 넣는다.
xxxxxxxxxx$ git add --all .$ git commit -m "My Django Girls app, first commit"[...]13 files changed, 200 insertions(+)create mode 100644 .gitignore[...]create mode 100644 mysite/wsgi.py
Github에 코드 배포
https://github.com/ 에서 Github 계정을 만들고 my-first-blog라는 이름의 새 저장소(new repository)를 생성한다. Initialize this repository with a README 체크박스는 체크를 하지 않은 상태로 두고 .gitignore와 라이센스 옵션도 None으로 한다.

다음 화면에서 HTTPS 버전의 주소를 복사하고 컴퓨터의 Git 저장소와 Github 저장소를 연결하기 위해서 콘솔에 아래와 같이 입력한다.
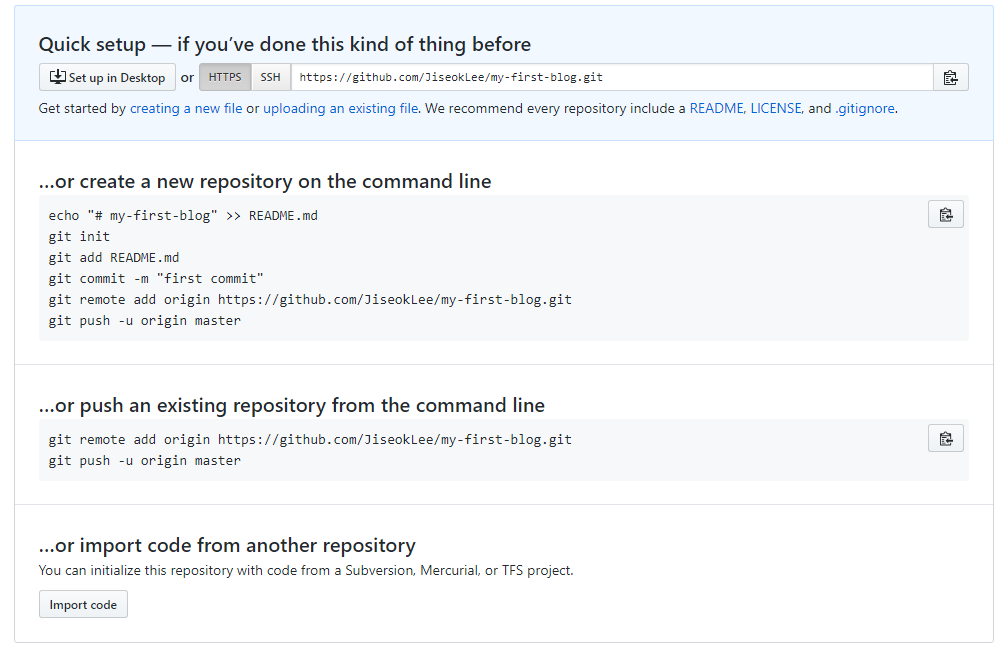
xxxxxxxxxx$ git remote add origin https://github.com/<your-github-username>/my-first-blog.git$ git push -u origin master
아래와 같은 화면이 나오면 Github 사용자 이름과 암호를 입력한다.
xxxxxxxxxxUsername for 'https://github.com': jiseoklee0502Password for 'https://jiseoklee0502@github.com':Counting objects: 6, done.Writing objects: 100% (6/6), 200 bytes | 0 bytes/s, done.Total 3 (delta 0), reused 0 (delta 0)To https://github.com/JiseokLee/my-first-blog.git* [new branch] master -> masterBranch master set up to track remote branch master from origin.
PythonAnywhere에 블로그 설정하기
https://www.pythonanywhere.com/ 로 접속해서 PythonAnywhere 회원가입을 한다.
Github에서 PythonAnywhere로 코드 가져오기
Consoles 페이지에서 Bash 콘솔을 실행한다.
Github에 있는 코드를 복제해오기 위해서 아래 명령을 콘솔에 입력한다.
xxxxxxxxxx$ git clone https://github.com/<your-github-username>/my-first-blog.git
PythonAnywhere에서 가상환경(virtualenv) 생성하기
PythonAnywhere에서도 가상환경을 사용하기 위해서 아래 명령을 콘솔에서 실행시킨다.
xxxxxxxxxx$ cd my-first-blog$ virtualenv --python=python3.6 myvenvRunning virtualenv with interpreter /usr/bin/python3.6[...]Installing setuptools, pip...done.$ source myvenv/bin/activate(myvenv) $ pip install django~=1.11.0Collecting django[...]Successfully installed django-1.11.3
PythonAnywhere에서 데이터베이스 생성하기
컴퓨터에서 했던 것과 같이 서버에서도 데이터베이스를 초기화 하기 위해서 migrate와 createsuperuser를 사용한다.
xxxxxxxxxx(mvenv) $ python manage.py migrateOperations to perform:[...]Applying sessions.0001_initial... OK(mvenv) $ python manage.py createsuperuser
Web App으로 블로그 배포하기
다시 PythonAnywhere 대시보드로 와서 Web을 클릭하고 Add a new app을 선택한다. 도메인 이름을 확정하고, manuel configuration을 클릭한 다음, Python 버전을 선택하고 다음을 클릭한다.
가상환경(virtualenv) 설정하기
PythonAnywhere의 web 부분이로 이동한 다음, virtualenv 섹션에서 Enter the path to a virtualenv라고 쓰여져있는 글자를 클릭하고 /home/<your-username>/my-first-blog/myvenv/ 라고 입력한다.

WSGI 파일 설정하기
장고는 파이썬을 이용한 웹사이트를 서비스하기 위한 표준인 WSGI 프로토콜을 사용해 작동한다. 지금 만든 장고 블로그를 PythonAnywhere에서 인식하게 하기 위해서 파일을 수정해 WSGI 설정을 변경한다.
방금 전 가상환경 설정하기와 같은 페이지에서 Code 섹션을 보면 WSGI configuration file을 클릭한 다음, 모든 내용을 삭제하고 아래 내용을 넣는다.
xxxxxxxxxximport osimport syspath = '/home/<your-PythonAnywhere-username>/my-first-blog'if path not in sys.path: sys.path.append(path)os.environ['DJANGO_SETTINGS_MODULE'] = 'mysite.settings'from django.core.wsgi import get_wsgi_applicationfrom django.contrib.staticfiles.handlers import StaticFilesHandlerapplication = StaticFilesHandler(get_wsgi_application())이 파일은 PythonAnywhere에게 웹 어플리케이션의 위치와 장고 설정 파일명을 알려주는 역할을 한다.
StaticFilesHandler는 CSS를 다루기 위한 것이다.
저장을 누르고 web 탭으로 가면 어플리케이션을 볼 수 있다.
'Python > Django' 카테고리의 다른 글
| 장고 걸즈 튜토리얼 따라하기 7 - 장고 뷰 (0) | 2018.12.26 |
|---|---|
| 장고 걸즈 튜토리얼 따라하기 6 - 장고 urls (0) | 2018.12.24 |
| 장고 걸즈 튜토리얼 따라하기 4 - 장고 관리자 (0) | 2018.12.19 |
| 장고 걸즈 튜토리얼 따라하기 3 - 장고 model (0) | 2018.12.14 |
| 장고 걸즈 튜토리얼 따라하기 2 - 프로젝트 설정 (0) | 2018.12.12 |